Visualizzazione post con etichetta a tavola. Mostra tutti i post

mercoledì 5 dicembre 2012

Menù Light pre Natale - {A Light Menu pre Christmas}

Questo periodo la cosa più difficile da fare è ottenere una buona cena ma con poche calorie visto le super mangiate che ci attendono a breve... E senza mai dimenticare una bella presentazione.

Oggi vi propongo un piatto bello, buono e light!!!!

Pollo al curry con riso basmati


Ingredienti

1 petto pollo
Farina
Carota
Sedano
Cipolla
Dado vegetale
Vino
Curry
Riso basmati

Tagliate un petto di pollo a dadini e dopo averli saltati in padella farli cuocere per un pò con gli odori tagliati a pezzettini (io uso anche il preparato per soffritto surgelato). Dopo aver sfumato con il vino il pollo farlo cuocere per 15 minuti allungandolo con il brodo (preparato con il dado), poi sciogliere il curry (la quantità sceglietela in base ai vostri gusti) in un pò di brodo ed aggiungerlo al pollo, salarlo e mandarlo in cottura per altri 10 minuti circa. Nel frattempo cuocere il riso basmati.

Impiattare a piacimento, io per oggi ho usato un coppa pasta in cui ho messo prima il riso e sopra il pollo, guarnendo con prezzemolo fresco e peperoncino.

Consigli:

Se vi piace il piccante potete mettere oltre agli odori nel pollo anche del peperoncino.
Per rendere più cremoso il pollo aggiungere a 5 minuti dalla fine cottura lo yogurt greco, rimarrà un piatto light acquisterà più carattere e sarà più corposo.


In this time, the hardest thing to do is get a good dinner but super low caloric saw the eating that await us in the short ... And never forget a beautiful presentation.

Today I propose a dish beautiful, good and light!!

Chicken curry with basmati rice


ingredients

1 chicken breast
flour
carrot
celery
onion
vegetable stock cube
wine
curry
basmati rice

Cut a chicken breast into cubes and after they stir-fried cook them for a while with herbs chopped (I use also prepared for fried frozen). After blended the chicken with the wine cook it for 15 minutes stretching it with the broth (made with cube), dissolve the curry (the amount choose it according to your taste) in a bit of broth and add the chicken, season with salt and send him to cook for another 10 minutes. Meanwhile cook the basmati rice.

Serve as desired, for today I've used a pasta bowl in which I put first over the chicken and rice, garnished with fresh parsley and pepper.

tips:

If you like spicy you can put over the chicken even chili.
To make it creamy add to the chicken 5 minutes from the end of cooking greek yoghurt, will acquire more character and will be more robust.

mercoledì 28 novembre 2012

Filetto in Crosta - {Fillet in a Crust}


Oggi facciamo una ricetta veloce ma buona perchè fatta con ingredienti ottimi. E' un modo diverso per proporre un filetto di manzo, non rovinandone però il sapore della carne.

Ingredienti:
Funghi champignon
Prezzemolo
Aglio
Panna da cucina
Pasta sfoglia
Filetto di manzo

Pulite e affettate i funghi champignon e metteteli in padella con aglio e prezzemolo a fuoco medio finché non saranno morbidi e coloriti a questo punto aggiungere un cucchiaio di panna un pò di sale e farla amalgamare.

Sigillare (cioè cuocere bene da entrambi i lati) nel frattempo i filetti in una padella antiaderente con olio e poi riporli in alluminio e tenerli al caldo. Prendere la sfoglia già  pronta e fare dei cerchi (con un ring o con un bicchiere), e metterli in una pirofila ricoperta con carta forno.  Spolverare con il pangrattato la sfoglia e poi metterci al centro il filetto, sopra i funghi cremolati e infine chiudere bene con un altro disco di sfoglia facendo aderire bene il lati delle sfoglie. Spennellare ogni fagottino con dell'uovo e infornare per 10 minuti a 180".
Tirare fuori dal forno, impiattare e mangiare caldi.


Today we take a quick recipe but good because it is made with excellent ingredients. It's a different way to propose a tenderloin of beef, but not ruining the flavor of the meat.

ingredients:
mushrooms
parsley
garlic
Cream
puff pastry
bread crumbs
Beef tenderloin

Clean and slice the mushrooms and put them in a pan with garlic and parsley over medium heat until they are soft and colorful, at this point, add a tablespoon of cream a pinch of salt and mix it.

Seal (ie cook well on both sides) in the meantime the fillets in a pan with oil and then store them in aluminum and keep them warm. Take the puff pastry ready and make circles (with a ring or a glass), and place them in a baking pan covered with parchment paper. Sprinkle with bread crumbs and then put in the center of the dough the tenderloin, over the creamy mushrooms and finally close tightly with another disk of dough by placing it well the sides of the pastry. Brush each dumpling with egg and bake for 10 minutes at 180 ".

Pull out of the oven, Serve and eat hot.


giovedì 15 novembre 2012

Una ricetta del riciclo - {A Recipe of Recycling}


Ragazze per chi come me ama stare in cucina sa che brutta sensazione si prova nel buttare qualcosa semplicemente perché avanzato dalla sera prima, ecco perché quando è possibile reinvento sempre.

Oggi vi mostro come un risotto allo zafferano avanzato si può riproporre sotto nuova forma e colore, perché in fondo si sa, la cucina è come la moda bisogna saper mixare.

Ingredienti:

Risotto allo zafferano già pronto (prossimo post magari lo facciamo insieme)
Cipolla
Pisellini surgelati
Provola

Mettete in un pentolino della cipolla e fatela indorare poi aggiungete i pisellini e farli insaporire con cipolla e olio dopodiché mettere dell'acqua e mandarli in cottura finché saranno teneri, quindi salarli.

Poi prendete degli stampini di silicone a forma di piccoli anellini e dopo averli spennellati di olio li riempite a metà di risotto, poi mettete un po' di pisellini e la provola fatta a cubetti e chiudete l'anello con il risotto.
Mettete gli stampi nel forno preriscaldato a 180° per circa 10-15 minuti .

Una volta fatti freddare per due minuti mettete due anellini in ogni piatto dei vostri ospiti al centro mettete i restanti pisellini et voilà il gioco è fatto.

Io per fare un piatto unico ho accostato questo primo a degli ossi buco di vitella.


Girls, for people like me who loves being in the kitchen knows that bad feeling you feel when you throw something simply because advanced from the night before, that's why when possible I always reinvent .

Today I show you how a advanced saffron risotto can revive in a new form and color, because deep down you know, cooking is like fashion must know how to mix.

ingredients:

Saffron risotto ready (next post maybe we do it together)
onion
frozen peas
provola

Put in a saucepan the onion and brown them, then add the peas and season them with onion and olive oil and then put the water and send them to cook until they are tender, then add salt.

Then take molds of silicone shaped like a small rings and after having brushed them with oil filled in the middle of rice, then put a bit of green peas and diced provolone ​​and close the ring with the risotto.
Place the molds in the oven at 180 * for about 10-15 minutes.

Once you've made it cool for two minutes put two rings on each plate of your guests to the center put the remaining peas and voila, you're done.

I to make a unique dish I first approached this in the ossibuco veal.


mercoledì 7 novembre 2012

Lieviti, Cous cous, Cioccolata e... Montersino - {Yeast, Cous cous, Chocolate and ... Montersino}


Bla bla bla non sai quanto è bravo bla bla bla. Umh e che bontà bla bla bla e che bellezza bla bla bla STOP!

Mamma fermati respira e raccontami. Mia madre è straordinaria, si emoziona per le cose che fa ancora come fosse una bambina e io ogni tanto la richiamo all'ordine, e così pure questa volta ho frenato la sua chiacchiera partita a manetta.

Forse non vi ho mai raccontato (perché non amo vantarmi delle cose che ho, ne tanto meno dei miei più cari affetti) della bravura fuori misura di mia madre in cucina, se non fosse stato per la sua dedizione alla famiglia avrebbe potuto tranquillamente fare la chef, ma non di quelle chef fighette che fanno solo nouvelle cousine ma che poi cadono sulle fondamenta, quanto piuttosto di quelle chef che hanno imparato il mestiere tra libri corsi e fornelli.

Mia mamma classe '63 si è sposata alla giovane età di 18 anni e non sapeva fare neanche un uovo al tegamino, era un po' viziata la ragazza. Ma ha presto imparato, e ora dopo 3 figli un nipote e un genero buongustaio è un fenomeno. La cosa più bella di lei (e di questo la ringrazio perché è un valore che ho nelle vene proprio) è l'umiltà, la più assurda è che fa dolci da urlo ma non li mangia...

Detto ciò torniamo al perché del suo blaterare. Da qualche anno si è appassionata alla pasticceria del salutista rinomato Luca Montersino e lunedì 5 novembre era appena rientrata da una 2 giorni in cucina con lui con tanta voglia di parlare e tante calorie da bruciare.

E si proprio con Montersino quello degli ingredienti impossibili da trovare, quello che qui nelle forniture per pasticceri tutti temono. Tre corsi: lieviti, cous cous e cioccolato e lei non ne ha saltato nessuno. E' rimasta entusiasta dall'abilità del pasticcere sia pratica (ma di questo non ne aveva dubbi) che dialettica "non hai idea di quanta passione, amore e competenza metta nelle spiegazioni". A stupirla nel vero senso della parola è stato poi Luca (ormai un mio amico visto che a casa ne parliamo come fosse uno di famiglia) nella versione cuoco, "bravissimo". Due cous cous buonissimi, a detta di mamma, e il cous cous è stato fatto da lui proprio partendo dal grano e grazie ad un mulino di legno da tavolo (bellissimo tra l'altro) che mia madre ha già puntato come imminente acquisto.

News di assoluta rilevanza per tutti i suoi appassionati a Roma da eataly c'è una sua pasticceria dove oltre a deliziarvi con le sue creazioni sarà anche possibile trovare i suoi magici ingredienti.

Ora vi lascio a qualche foto perché mia madre ha ancora da dirmi, ma vi anticipo che presto vi posterò qualche sua ricetta.


Blah blah blah you do not know how good he is blah blah blah. Umh and which goodness and which beauty blah blah blah blah blah blah STOP!

Mama stopped, breathe and tell me. My mother is amazing, gets excited for the things she does still like a child and I occasionally call her to order, and so this time I restrained her chat started talking rapidly.

Maybe I never told (because I do not like to boast of the things that I have, much less of my dearest affections) the skill of my mother in the kitchenif it had not been for his dedication to his family could easily make the chef, but not those pussies chef who only do nouvelle cuisine but then fall on the foundations, but rather to those chefs who have learned the trade of books and cooking courses.

My mother born in '63 was married at the age of 18 years and knew not even do a fried egg, was a bit 'spoiled girl. But she soon learned, and now after 3 children a gourmet son in law and a grandson she is a phenomenon. The best thing about her (and I thank her because it is a value that I have in my own veins) is humility, the most absurd is that makes cakes to scream but do not eat ...

With that said let's get back to why of her babble. For some years now has been passionate about the famous healthy pastry Luca Montersino  and Monday, November 5 she had just returned from a two days in the kitchen with him with a great desire to speak and as many calories to burn.

It is precisely with Montersino the one that the ingredients are impossible to find, here in the one that confectioners supplies all fear. Three courses: yeast, couscous and chocolate and she has not missed anyone. She was enthusiastic about the skill of the baker is practical (but this did not have any doubt) that dialectic "you have no idea how much passion, love and skill put in the explanations." A amaze her in the true sense of the word was then Luca (now a friend of mine since at home we talk about him as if he was one of the family) in the version cook, "bravissimo." Two delicious couscous, according to mom, and the couscous was done by him just starting from the grain mill and through a wooden table (beautiful by the way) that my mother has already pointed as imminent purchase.

News of great significance for all of his fans in Rome by eataly there is his bakery where over to delight you with his creations, you can also find his magical ingredients.

Now I leave you with some pictures because my mother has yet to tell me, but I anticipate that soon I'll post some of his recipe.

mercoledì 31 ottobre 2012

C'era una volta: una tavola apparecchiata {Once upon a time: a table laid}


Buongiorno a tutte oggi voglio raccontarvi una storia. La storia di una ragazza che anche se mangiava sola a casa amava apparecchiare di sana pianta tutta la tavola.

E parlo al passato perché è da li che partiamo.

C'era una volta una donzella che tra lavoro, sport, amici e famiglia non rinunciava mai a sedersi intorno ad una tavola per mangiare anche un pezzo di pizza, l'importante se stava a casa era che tutto fosse messo su una candida tovaglia.

Poi un giorno seduta ad un bar incontra il suo principe azzurro e quindi apparecchiare era ancora più bello. Dopo anni di conoscenza i due convolano a nozze e la donzella impazzisce per fare il corredo tra lino e merletti ogni sera a cena sembrava di essere in un ristorante.

Poi un giorno un test comunicò ai due giovani che sarebbero diventati tre e da li la vita cambia.

Nato il primogenito ci si catapulta in una realtà del tutto sconosciuta: mangiare di corsa tra una poppata e l'altra, preparare la cena in tempi da record e soprattutto vengono scoperte le tovagliette all'americana!

Finché dopo i primi mesi il neonato comincio a sedersi al tavolo con i genitori e da li cominciò la catastrofe estetica... Ebbene si perché se i due sposi da una parte erano felici di avere un figlio con loro che man mano cresceva ed imparava a mangiare da solo, dall'altra parte c'era la giovin donzella (ormai neanche più troppo giovin) che guardava disperata l'operato del figlio.

Ma i vari libri di pedagogia e i vari metodi educativi dicono che sperimentare per i bimbi è normale e giusto, quasi un obbligo e quindi la mamma non poteva far altro che lasciar fare... Chiedendosi "ma quando finirà tutto ciò?"


Good morning to all, today I want to tell you a story. The story of a girl that even though eating alone at home loved set the table.

And I speak in the past because we depart from there.

There once was a girl that between work, sports, friends and family never let go sit around a table to eat a piece of pizza, the important thing was that if she was at home everything was put on a white tablecloth.

Then one day, sitting at a bar she meets her prince charming and then set the table was even more beautiful. After years of knowledge the two get married and maiden goes crazy to make the set of linen and lace every night at dinner seemed to be in a restaurant.

Then one day a test communicated to the a young couple who would become three and from there life changes.

Born the eldest you are catapult into a completely unknown reality: eating on the run between feedings, prepare dinner in record time and are mainly discovered placemats!

Until after the first few months, the baby started to sit down with the parents and from there began the disaster aesthetic ... Well yes because if the couple were happy to be a part of having a child with them as they grew up and learned to eat by himself, the other side was the young maiden (now even more so young too) who watched desperate the 'actions of the child.

But the various books of pedagogy and the various methods of education say that experience for the children is normal and right, almost a requirement and then the mother could not help but let it do ... Asking "but when will end all of this?"

mercoledì 24 ottobre 2012

GUEST POST: Muffins alla Zucca {Pumpkins Muffins}


Oggi ospitiamo il nostro primo Guest Post!! Siamo emozionatissime!!!

Lei è Silvia, da Reus, Spagna, residente a Melbourne, in Australia, con la passione per cucinare cupcakes, muffin, biscotti e tutto ciò che può essere eventualmente sfornato. Tutte le sue ricette si possono trovare nel suo blog "Dulce Pecar" (in spagnolo), che di sicuro addolcirà la vostra vita. È stata invitata a riempire la nostra valigia di piccoli pezzi di cielo, felice di condividere questa ricetta che è perfetta per Halloween. Deliziosi Muffin di zucca! Dolcetto o scherzetto!


Ingredienti (per apross. 12 unità): 

1 uovo
1 cup di farina
1/2 cup di zucchero di canna
1 cup di purè di zucca (per farlo avrete bisogno di una zucca piccola)
1/2 cup di latte evaporato (latte condensato non zuccherato)
1/2 cup di uva passa
60 g di burro (senza sale)
2 cucchiaio (tsp) di bicarbonato sodico (dal set de cucchiai, la numero 3)
1 cucchiaino e 1/2 di cannella in polvere (dal set de cucchiai, la numero 3 y 2)
1 cucchiaino y 1/2 di essenza di vanillina (dal set de cucchiai, la numero 3 y 2)
1/4 de cucchiaino di zenzero in polvere (dal set de cucchiai, la numero 1)
1/2 cucchiaino di sale (dal set de cucchiai, la numero 2)
1/2 cucchiaino di noce moscata (dal set de cucchiai, la numero 2)


Preparazione:

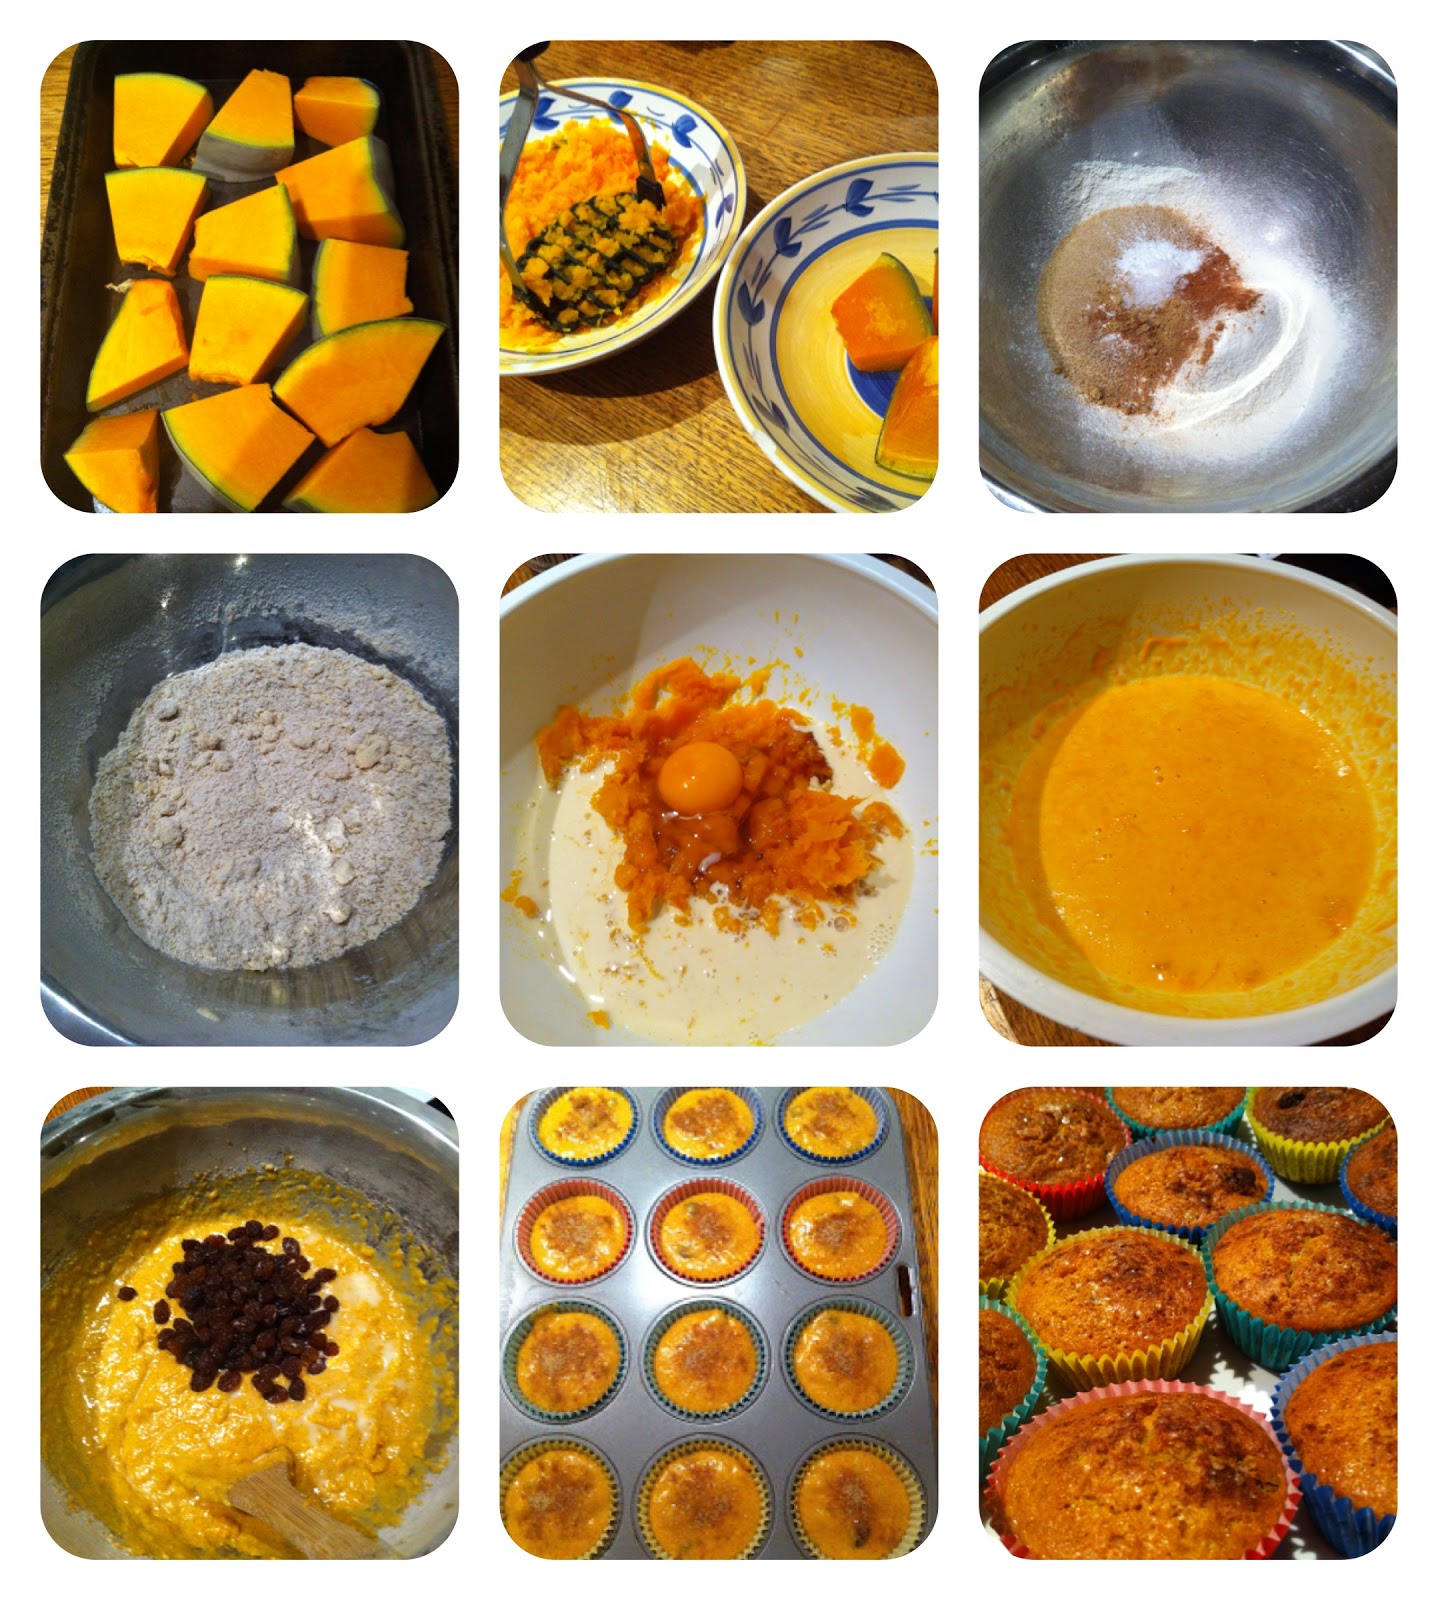
Iniziamo preparando il purè di zucca. Tagliamo in due la zucca e togliamo i semi. La tagliamo a pezzi e la mettiamo nella placca dal forno (preriscaldato a 180°) per 15-20 minuti. Sappiamo che è pronta perché prende un colore più arancione e si ammorbidisce. Una volta pronta, la lasciamo raffreddare e la sbucciamo. Dopo la schiacciamo con una forchetta, con un "potato masher" e con il minipimmer.


Mescoliamo la farina (setacciata) con lo zucchero di canna, il bicarbonato, la cannella, la noce moscata, lo zenzero e il sale e aggiungiamo il burro ammorbidito.

In un'altra ciotola mescoliamo l'uovo, il latte evaporato, la purea di zucca e l'essenza di vaniglia. Lo battiamo tutto per qualche minuto e poi lo aggiungiamo al composto che abbiamo fatto con la farina, ecc ...

Una volta che abbiamo il prodotto pronto, riempiamo i pirottini (2/3 della capacità). Per riempirli un trucco semplice e pulito è utilizzare un cucchiaio di gelato. Un carico è circa la quantità giusta per riempire un pirottino. Prima di cuocerli gli diamo una spolverata con cannella e zucchero di canna.

Li mettiamo in forno (già caldo) a 180 ° per 20 minuti. Una volta pronti, li mettiamo a freddare sulla graticola.


Pumpkins Muffin by Dulce Pecar


Today we host our first Guest! We are just thrilled!

She is Sílvia, from Reus, Spain, residing in Melbourne, Australia, with a passion for baking cupcakes, muffins, cookies and anything than can be possibly baked. All her recipes can be found in her blog "Dulce Pecar" (in Spanish) which will for sure sweeten your life. She has been invited to fill our suitcase of little pieces of heaven and is delighted to share this recipe which is perfect for Halloween. Delicious pumpkin muffins! Trick or treat!!!


Ingredients (for 12 units):

1 Egg
1 cup All-purpose Flour
1/2 cup Brown Sugar
2 tsp Baking Powder
1-1/2 tsp Cinnamon
1/4 tsp Ground Ginger
1/2 tsp Nutmeg
1/2 tsp Salt
60 gr of Butter, cut into pieces
1 cup Pumpkin Puree (to make it you will need a small pumpkin)
1/2 cup Evaporated Milk
1-1/2 tsp Vanilla
1/2 cup Raisins 


Preparation:

We will start preparing the pumpkin puree (you can also prepare it the day before and keep it in the fridge): cut the pumpkin into 2 pieces and remove the seeds with a knife. Then cut it into smaller pieces and put it in the oven (preheated to 180 degrees) during 20 minutes. We will know when it is cooked because the pumpkin will get softer and more "orangie". Once it is cooked, clet it cool down and then peel it and mash it with a potato masher or a blender. Keep it aside.

Preheat the oven to 180 degrees and put the baking cups in the muffins tin.

Sift flour, sugar, baking powder, cinnamon, ginger, nutmeg, and salt. Cut in butter and mix it all together until it is fully incorporated. In a separate bowl, mix the pumpkin puree, evaporated milk, egg, and vanilla. Pour pumpkin mixture into the flour mixture and add raisins. Stir gently until mixture is just combined.
Pour into the baking cups (3/4 full) and sprinkle with cinnamon-sugar mixture over the top of each unbaked muffin.

Bake for 20-25 minutes. Once ready, put aside to allow the muffins to cool. Et voilá...ready to enjoy a super autumnal recipe!

mercoledì 17 ottobre 2012

Zuppa di Porcini in Crosta {Crusted Porcini Soup}


Oggi siamo in cucina! Ora prima di scrivervi la ricetta della settimana ci tengo a specificare che ogni mio piatto è il risultato di ricette rubate e riadattate da siti, blog, libri, amiche, tradizioni e pertanto chiedo scusa fin da ora se qualche pietanza potrebbe risultare come rubata a questa cuoca o a quell'altra ma non ricordando da dove ho preso la ricetta non ne cito la fonte (che quasi sempre è mia mamma).

Eccomi ai fornelli per spiegarvi come fare una zuppa ai porcini che noi in famiglia adoriamo.
La facilità di esecuzione è direttamente proporzionale alla bontà quindi cominciamo dalla spesa.

Ingredienti:

350gr funghi porcini
350gr funghi champignon
1 patata
Brodo vegetale
Sale
Aglio
Prezzemolo
Peperoncino

La parte più delicata è sicuramente la pulizia del Porcino: mettete i funghi in ammollo per qualche istante in acqua salata poi tirateli fuori e per eliminare la terra usare un panno umido. Una volta lavati dividete il cappello dei porcini dal gambo e tagliate a fettine sottili i gambi e in parti grandi la testa del fungo.

Da parte tagliate gli champignon a fette e metteteli in una padella con olio aglio prezzemolo e i gambi dei porcini e fateli saltare.

Una volta che i funghi si saranno rosolati bene aggiungete il brodo vegetale caldo e la patata (capata e fatta già a fettine) il sale e mandare il tutto in cottura a fuoco medio per 40 minuti.

Nel frattempo preparare un soffritto con aglio olio e peperoncino e buttarci dentro la testa dei porcini e farle cuocere per circa 5-7 minuti. Quando i funghi saranno cotti nel brodo eliminare dal tegame il peperoncino e frullare il tutto, aggiungere poi le teste dei porcini e lasciarle insaporire nella zuppa.

La zuppa è pronta, ma io per renderla ancora più buona la faccio in crosta.

Prendete una ciotola che può essere messa in forno, metterne all'interno la zuppa e chiudere la ciotola con un disco di pasta sfoglia e metterla in forno a 180 gradi finché la crosta non sarà dorata.

Consigli:
Per far aderire la pasta sfoglia alla ciotola usare un composto fatto con acqua e farina e con un pennello passarlo per il bordo della ciotola.

Per una sfoglia perfetta bucarellatela con una forchetta e spennellatela con un uovo.


Porcini Soup by Angela - Part I


Porcini Soup by Angela Part II


Today we are in the kitchen! Now before I write the recipe of the week I want to specify that all my dish is the result of stolen prescriptions and adapted from websites, blogs, books, friends, traditions, and therefore I apologize right now if any dish could be stolen like this chef or that other but not remembering where I got the recipe do not mention the source (which is almost always my mom).

Here I am in the kitchen to show you how to make a soup with porcini mushrooms in the family that we adore.
The ease of execution is directly proportional to the goodness, so let's start by spending list.

ingredients:

350g mushrooms
350g mushrooms
1 potato
vegetable broth
salt
garlic
parsley
chilli

The trickiest part is definitely cleaning Porcino: Put the mushrooms to soak for a few minutes in salted water, then pull them out and eliminate the ground use a damp cloth. Once washed divide the hat of porcini, from the stem and thinly sliced ​​stems and in large parts the mushroom head.

On the other hand cut the mushrooms into slices and place in a pan with the stems of the porcini, oil, garlic and parsley and let them fry.

Once the mushrooms are roasted well, add the hot vegetable stock and potatoes (already stripped and made ​​into slices) salt and get everything in cooking over medium heat for 40 minutes.

Meanwhile, prepare a sautéed mixture with garlic and pepper and throw in the heads of the porcini, and cook for about 5-7 minutes. When the porcini are cooked into the broth remove from the pan the chilli and whisk well, then add the heads of the porcini, and cook in the soup.

The soup is ready, but to make it even better I do in the crust.

Take a bowl that can be placed in the oven, put the soup inside and close the bowl with a disc of puff pastry and place in the oven at 180 degrees until the crust is golden.

tips:
To adhere the puff pastry to the bowl using a compound made ​​with flour and water and with a brush pass it to the edge of the bowl.

For a perfect pastry repeatedly puncture with a fork and brush it with an egg.

mercoledì 3 ottobre 2012

Inspirazione: New york! {Inspiration: New York!!}


Qualche giorno fa il mio adorato fratellino ha compiuto 25 anni e visto che ogni volta che devo trovare il regalo giusto per lui spendo troppo, sia in soldi che in tempo di ricerca, la tavola per la cena tra parenti e l'aperitivo del giorno dopo per gli amici è stata Low Cost. Circa 50€ di spesa per entrambe le serate. Son partita da un suo grande amore : New York e attorno a questo ho apparecchiato. Bianco rosso e nero i colori che hanno padroneggiato per le feste.

Per la cena a casa è stato complicato adattare il salone dei miei stile classico ad un tema moderno.... Un centrotavola fatto di un vaso ricolmo di mele rosse poggiato su una tovaglia bianca con sopra un runner nero di carta tessuto non tessuto. Divertente è stato scrivere con il gesso bianco sul runner, personalizzandolo a mio piacimento. Come segnaposti ho usato delle mini lavagnette su cui ho scritto il nome in english of course! Come chiudi tovagliolo un cuore brillante nero. Ceramiche bianche, bicchieri di cristallo ed il gioco era fatto!

L'aperitivo del giorno dopo è stato fatto su una terrazza privata nel centro di Roma, il leitmotif lo stesso. Stavolta i tavoli erano neri quindi ho creato dei runner sempre di carta tessuto non tessuto bianchi, poggiato sopra delle tovagliette nere e al centro del tavolo una semplice scritta: I Love Big e una mela rossa. Candele, cuscini rossi e un pannello disegnato a mano posizionato dietro il buffet raffigurante lo skyline. Idee semplici ed economiche per una serata in cui è stato il divertimento a farla da padrone.

Consigli: usate prima di tutto i gessetti sulla carta tessuto non tessuto così da poter cancellare in caso di errore e poi ripassare il disegno definitivo con un pennarello tipo Uniposca brillante!

Divertente usare anche delle cassette di frutta di legno come centrotavola!


A few days ago my beloved little brother turned 25 years old and because every time I have to find the right gift for him to I spend too much, both in money and in time of research, the table for dinner with family and and the party of the day after for friends was Low Cost, about 50 € spent for both evenings. I am started by one of his great loves New York and around this I have set the tables. White, red and black colors that have mastered for the parties.

For dinner at home was complicated to adapt the classic style dinning room of my parents with a modern theme .... A centerpiece made ​​of a vase filled with red apples resting on a white tablecloth with above a black runner in paper non-woven fabric. Was fun  to write with white chalk on the runner, customizing it as I please. As placeholders I used mini slates on which I wrote the name in english of course! Like napkin close a brilliant black heart White ceramics, crystal glasses and the game was done!

the aperitif of the next day was done on a private terrace in the center of Rome, the leitmotif was the same. This time the tables were black so I made the runner always of paper non-woven fabric white, black napkins and placed above the center of the table a simple inscription: The Love Big and a red apple. Candles, red pillows and a hand-drawn panel located behind the buffet depicting the skyline. Simple and inexpensive ideas for a night on which fun was to lord it.

Tips: used first chalk on paper non-woven fabric so that you can delete on error and then wipe the final design with a marker type brilliant Uniposca!

Funny also use the wooden crates of fruit as a centerpiece!

mercoledì 19 settembre 2012

{I Love Hamburguer}


E stasera in casa mia e' la serata dell'hamburger. Un divertimento all'inizio una tradizione ormai. Tutti in famiglia adoriamo gli hamburger (amore cresciuto in maniera esponenziale dopo il primo viaggio a New York), amici e parenti sanno che se capitano a cena in una serata così sicuramente non restano digiuni. Con gli anni ho inoltre cominciato a condire da me la carne ed ecco ora il risultato.

Ingredienti per 6 hamburger
750 gr di carne macinata mista tra vitella e vitellone
2 fettine di pane (io uso il panbauletto integrale)
Latte
Pangrattato
1 uovo
Parmigiano Reggiano
Sale q.b.

Mettere il pane ad ammorbidire nel latte e aggiungere tutti gli ingredienti (tranne il pangrattato) alla carne macinata e impastare a volontà (non siate avare in questo perche' il segreto e' tutto nell'impastare bene) aggiungere pangrattato se necessario per rendere il macinato di una giusta consistenza. Al termine usare una forma per Hamburger (se non la avete fate prima delle polpette e poi appiattitele) e fate i vostri hamburger.

Contemporaneamente preparate degli spinaci lessi, dei funghi trifolati, dei pomodori a fette e condite l'insalata.

Ora mentre cuocete gli hamburger scaldate il pane che preferite (io uso del pane azimo fresco) fate delle uova fritte e tra senape, ketchup e contorni create il vostro panino.

Ah! Non dimenticate una buona birra ghiacciata. Buon appetito!!


Hamburguers by Angela

mercoledì 12 settembre 2012

Come apparecchiare la tavola {How to set the table}


Ho creato un mostro!!! Aiuto!!!

Vi spiego meglio. Mio marito è a casa in  malattia, cioè, si è sfasciato il ginocchio giocando a calcio con bambini di 8 anni, abbiamo già provato a dirgli che a 40 certe cose non reggono come una volta, ma non capisce... Il fatto è che è a casa, così quando torno del lavoro mi trovo il pranzo pronto e la tavola apparecchiata, non male direi.

Il caso è che ieri mi sono resa conto che era apparechiata bene. Normale? No.
Io sono di quelle pignole che usa i tovaglioli di tessuto e mette il coltello a destra e la forchetta a sinistra, il bicchiere dell’acqua e quello del vino... queste cosucce. E mi rendo conto che non tutti ci tengono a queste cose, anche per ogni giorno. Nel senso, non che metta tutti i giorni i cristalli e le porcellane, ma anche i bicchieri dell'Ikea hanno il loro posto a tavola.

Quindi ho pensato di mettere i basici, cioè, come aparecchiare un tavolo, senza fronzoli ma bene, che anche se a qualcuna può sembrare una cosa ovvia pare non lo sia tanto...

Cucchiaio e coltello a destra, con la lama rivolta verso il piatto, mi raccomando. Forchetta e tovagliolo a sinistra, il tovagliolo lo potete mettere a sinistra della forchetta, sotto di questa o anche sul piatto se volete. Bicchiere del acqua a destra e quello del vino a sinistra di quello dell’acqua. E voilà, una tavola ben apparecchiata!! Non è poi così difficile, vero?


I've created a monster! Help!

Let me explain it better: my husband is sick at home; he smashed his knee playing soccer with 8 years old children. We have tried to explain him many times that when you are 40, there are some things you just cannot do as before, but he doesn’t seem to understand. The fact is that he is at home and when I return from work, lunch is ready and the table set. Not too bad, isn’t it?

Yesterday when I came back home for lunch I realized that the table was properly set. Is this normal? No.
I am very picky; I use fabric napkins and put the knife on the right and the fork on the left, a glass for the water and another one for the wine ... small details. I realize that not everyone care about these details. Of course I do not use the crystals and porcelain every day, Ikea glasses have their place at the table, too.

This is why I have decided to write some basic tips about how set the table, even though this may sound very obvious for some people, sometimes it isn’t for other.

Put the spoon and the knife on the right side, with the blade facing the plate, please. Put the fork and the napkin on the left side. You can also put the napkin on the left of the fork, below the fork or on the plate if you want. The glass of water goes on the right side and the wine glass next to it (left). And voilà, a beautifully settled table! It's not so hard, isn’t it?

mercoledì 5 settembre 2012

Chi Viene a Cena? {Who's Coming to Dinner?}


Tutti a tavola.... E’ pronto... Avete apparecchiato?
Ancora quando preparo la cena ricordo di quando da piccola puntualmente mamma ci chiamava per mangiare ma nessuno aveva preparato la tavola nonostante lei lo avesse ripetutamente detto a me e ai miei fratelli ed ora che anche io quando chiamo tutti per la cena mi ritrovo senza bicchieri o posate dopo un turbamento organizzativo mi viene troppo da sorridere.
Qui ce ne sarà veramente per tutti: cultura catalana e italiana a confronto tra fornelli e tovagliati...


Facciamoci un drink per brindare a questo viaggio che inizia adesso, vi va? Ovviamente verde, ovviamente alla menta, non bisogna smentirsi...

A tavola!!!!!!!


Ingredients:
1/3 Liqueur Pepper mint Green
1/3 Liqueur Créme Cacao White
1/3 Cream
Cocoa Powder
Mint Leaves

Put the ice in the shaker, ad Pepper mint Green, Cacao White and cream in equal parts. Shake. Serve with som Cacao Power on the top and Mint Leaves


Dinner is ready, everyone sit at the table. It is ready. Have you set the table?

Even now when I make dinner I remember when I was a child and my mom promptly called us to sit at the table to eat dinner but no one had set the table although she had repeatedly asked me and my brothers to do so. Now it is me calling my family for dinner and I find myself with an empty table…no glasses, no plates, no forks and knives and this makes me smile. Same old story.

We will compare Catalan and Italian culture between the kitchen and the table cloth...
Let's have a toast for this trip that just begins, shall we? Obviously green, obviously mint.

Dinner is ready!!!!
Related Posts Plugin for WordPress, Blogger...